Showing posts with label Eco-friendly. Show all posts

Sunday, June 30, 2013

How (& How Not) to make your own (All Natural) Sugar Wax!

Sugar wax: (n) a sugar based goop that you can use to pull the hairs from your body in one fell swoop (or many fell swoops, depending)


"OUCH!" you say, "Why would you want to do that?" Well probably because, growing up in a time and place where we are taught that one's outer appearance is the truest form of beauty and that girls aren't supposed to have hairy legs or pits or faces, I have come to view my own body hair as "icky". And while I realize that this subconscious notion is wrong, and that all bodies are beautiful just the way they are, its too late- already built in. So being from an exceptionally hairy peoples shaving just doesn't 'cut it' anymore (tee hee) and of all the waxing methods I've tried sugaring is the the easiest on my skin, and easiest to clean up.

And its ALL NATURAL and you just need 3 SIMPLE INGREDIENTS. So here's how I made mine.

Things You'll Need

  • 1 Lemon
  • 2 cups sugar 
  • 1/4 cup honey
  • saucepan
  • scrap cotton fabric (old sheets work too!)
  • scissors
  • a wooden stick (big Popsicle sticks work best) 
  • a mason jar for storing wax

 Lets get started!
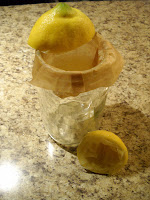
 

My Lemon Juicing Rig

Step 1) Mix Sugar, Honey, Lemon Juice

First begin preparing your lemon. I used a paper coffee filter over the lip of the mason jar (secured with a rubber band) and squeezed all the juice I could manage. That way it filtered out all the pulp. This will take a few minutes. So meanwhile, measure all your ingredients into your saucepan. I'm sure any 2 cups of sugar would work, but I was running a wee-bit low on plain sugar so I used 1 1/2 cups of brown sugar and 1/2 cup granulated sugar (my wax ended up being quite dark, so this may be why). Then add your 1/4 cup honey and your filtered lemon juice. (Don't toss out that lemon peel just yet!)

Step 2) Heat and Stir

I wanna say that I did this step in a way I'd never want to do it again. so DONT: melt down the sugar and then add honey and lemon juice. It will boil and bubble and probably splatter and burn you like it did to me. Instead, DO heat all ingredients together over medium to medium-high heat until they begin to melt together. As the sugar begins to melt and caramelize  be sure to stir often so that it doesn't burn. For me this took a good 30-40 minutes. (Sugar has a high melting point.) Once it gets to a light honey color take it off the stove. Pour it into a clean mason jar (wide mouth is best) and let it cool. It will continue to thicken and darken (and if you use brown sugar like me it will end up dark as molasses).


Oh and be careful when mixing the sugar at first. Its quite thick and I broke my favorite bamboo spatula!

Step 3) Wax Those Hairs!

Cooled Sugar Wax that's Ready to Use!
Break out those scissors and start cutting some strips out of that scrap cotton or old sheets! I forgot to pre-wash my muslin, so It was one time use for me (as they shrunk in the dryer), but if you use old sheets, you should be able to easily wash and reuse them! Cut them whatever size you need- I waxed my legs so I cut them into 2.5"x5" strips. Make sure the wax is cool enough not to burn you, but still warm enough to easily spread. Apply wax using your wooden stick (I used a thick kabob stick-because that's all I had around) Make sure to spread it on in the same direction as the growth. Smooth a cotton strip over it- again be sure to smooth in the same direction as hair growth. Then brace yourself, take a deep breath, and yank that sucker off of there in the OPPOSITE direction than the hair growth. OuchYay! You did it! (I don't have a picture of that part because my legs were insanely gross AND the pictures didn't turn out well *phew!*)

Cleaning Up!

Clean up should be pretty easy. Use warm water to rinse all your strips if you want to reuse them (or toss em out if you don't). Any leftover wax on your skin can also be removed with warm water.

Also, like any other waxing, sugaring may leave your hair follicles a little red, so I use those LEMON PEELS that we saved from earlier and rub them on the waxed areas. Not only does it smell good, but it seems to help keep the inflammation and stinging down. :)


Re-Using Leftovers

Don't waste your leftovers! Once cool, put a lid on your jar and store it in your fridge. All you have to do to REHEAT your wax is place your jar in a pan of boiling water (just enough to reach the wax level in the jar). It will get all soft and pliable again. Remember to keep your washed cotton strips too!

Happy Waxing!!


Wednesday, March 6, 2013

Why Plan on Cloth Diapering?

Of course I can't say that I've done it yet, but I know that it's what I want: cloth diapers. While many people have "good luck with that" and "it wont last long" remarks if I mention that I want to cloth diaper my little one, my mother, who typically plays a snarky devil's advocate to my eager/naive/optimistic ideas, had nothing but positive and encouraging things to say-- which only told me that I can absolutely do it! She cloth diapered me, she was cloth diapered, and so was my father.

My mother and I both have eczema- luckily it seems that mine is more acute- but this has always caused problems for us in the way our skin reacts to lotions, soaps, detergents, fabric softener (especially), and disposable diapers! When I was born there wasn't anything my mom could do to keep the rash away except for using cloth. (The only negative thing she had to say was that it was pretty gross having to hand scrub my solid-food diapers in the toilet.) My biggest concern is that little one will have eczema, too. Which leads me to:

Reason 1.) Sensitive Baby Bottoms
All babies have sensitive skin, especially on their bottoms (and this goes double when mom has sensitive hands), so I would rather use all-natural cloth diapers (at least natural fiber prefolds or inserts) than disposables because the absorbent powder used, sodium polyacrylate, is a known irritant (to skin, eyes, and respiratory systems!) My mom always said that she didn't have to use diaper creams with me once she started using cloth- but she also slathered me up with baby oil or olive oil after bath time.There are also silk liners available for cloth diapers that can be used in place of diaper creams, if little one gets a rash.

Reason 2.) Cost
I can't speak first hand about the cost of disposable diapers (not now, and hopefully not ever) so I have found the following sources for information on diaper costs.
  • http://www.howmuchisit.org/how-much-do-diapers-cost/- While this site has a helpful chart describing the sizes and prices of diapers throughout infancy, they estimate that in the first year a baby uses about 5 diapers a day totaling to about $460. This seems incredibly inaccurate according the research I've done in pregnancy forums- a more accurate estimate would be that a baby goes through 8-15 diapers a day, which is more than original estimate- totaling to $740- $1300 in the first year.
  • http://www.costevaluation.com/diapers-cost.php - This site estimates that disposable diapers cost between $750-$2500 dollars in 2.5 years of diapering. It would cost $750 dollars if you only ever bought diapers on sale or with coupons and $2500 dollars if you always bought the higher priced diapers at full price. It also gives a more median estimate of $1000 dollars for the first year and $800 for the second year. 
So lets say two years of disposable diapering cost about $2000 dollars. NOTE: This does not include the price of disposable wipes.

Now let's look at cloth diapers. I'm not sure which route everyone goes, but I think I'll just tally up all the diapers that I am interested in buying.
There are lots of different cloth diapers, but they can be divided into two categories- those that will need covers (flats, prefolds, fitteds) and those that have them built in (pockets, all-in-ones). There are many styles and brands out there, but I have decided on starting out with GreenMountainDiaper prefolds and an assortment of covers and then stocking up on some bumGenius 4.0 one-size pocket diapers later (when I know that they will fit little one). More specifically I'm considering going with the bundle packages that they offer to save money (and time).
  • GMD Newborn Full Setup Kit
    • 3 dozen newborn size cotton prefolds
    • 1 dozen small size (bigger than newborn) cotton prefolds
    • 6 covers (assorted sizes and brands)
    • 1 Snappi Fastener
    • 1 Kissaluvs Diaper Lotion Potion Concentrate
    • 1 Empty spray bottle 
    • 1 dozen flannel wipes
    • 2 does two sided cloth wipes
    • 1 pair pins
      • $212.25
      • $6.95 shipping
  • bumGenius 4.0 One-size diaper 12-pack
    • 12 bumGenius pocket diapers (get to choose velcro-type or snap buttons)
    • 12 newborn inserts
    • 12 one-size inserts
      • $203.40
      • free shipping (i think)
That comes to a total of 5 dozen diapers (which I am optimistically thinking might be enough to last baby through potty training.) This does not include the extra (cute and adorable) covers I will probably buy and make. The cost comes to about $425 dollars. NOTE: This estimate does include wipes. Also, the bumGenius are quite expensive in that they are also (seemingly) more convenient than other types of diapers-- so you could even be more frugal than me.

Even if I was able to spend another $200 dollars on cloth diapers until potty training I would still save about $1400.  These numbers are rough estimates based on research alone, but I feel pretty confident in that I will save immensely by cloth diapering. (I'm sure there are other CD moms out there who would vouch for that!)

One last note on cost (which will bring us right to our next point) that usually cloth diaper babies only need diapers for two years before potty training, where as using disposable diapers you'll have to factor in another  6 -12 months diapering..By choosing cloth instead you would be saving an additional $500-$1000 dollars. So about that....

Reason 3.)  Potty training happens sooner
I didn't exactly find top of the line research on this, but I think its a general consensus between CD moms that their tots potty train sooner because the cloth diaper allows for them too feel the wetness against their skin, hinting to them what their body is doing, as opposed to disposables which stay dry feeling against their skin.

Reason 4.) Cloth diapers are CUTE!
 You can get cloth diapers and diaper covers in every color imaginable and any print you want! There are so many brands that are brightly colored and just adorable. If you're crafty enough, you can even find a fabric print you like and a cover pattern and make your own diapers! The cuteness possibilities are endless. Then again anything can beat a saggy 'sposie if you ask me...

Reason 5.) Environment
Last but not least, its better for the environment. An estimated 27.4 BILLION diapers are used in the US alone... That's a lot of crystallized poo just sitting in landfills. YUCK. If we don't take charge of making this earth a better place for our children, and reduce the amount of waste we are producing, who do you think will?!?

I guess cloth diapering isn't very convenient for everyone, but the Pollinator and I agree that its best for our little hive. We also plan on getting a handy diaper sprayer, so I don't have to scrub them out in the toilet like my mom did. It seems cloth diapering is even easier than it was years ago!

A Little About Me...

Hello there. So, for what its worth, lets just call me Crunchy Bee. I've been on this little wet planet for 21 years, and though I have plenty left to learn, I feel that I have at least a little knowledge and wisdom worth sharing with anyone who cares to listen. My hair is messy and unkempt, my Chuck Taylor's stay dirty and half-untied, and I've got so many craft supplies, boxes of fabrics, yarns, and all the necessary hard-wares that I have a difficult time keeping them organized. On the other hand I'm an attentive gardener, I enjoy cooking up healthy from-scratch meals for my hubby-to-be, and I love my two dogs so much that sometimes I irritate them with all my cuddles.

Oh and I'm super excited to share with anyone willing to listen (except for my FB friends who will get the memo on 4/1/13- teehee) I am 18 weeks pregnant! This will be fiance's (should we call him the Pollinator?) and my first child; we couldn't be happier.

I've decided to start this blog for many reasons. I'd like to use it as a resource, a collection of sorts, for any all natural DIY projects or home remedies that I find useful- and I hope that you can find this resource useful as well! I need it as an outlet, perhaps, to vent worries, frustrations, excitements, and ideas that I just need to get out of my head. I'd like to share with you those ideas and opinions and prompt you for feedback and your own opinions on whatever matter is at hand- I'd like to keep this blog an open discussion where all are welcome!

Of course, a big part of this blog is to document my journey through pregnancy and motherhood. I'm going to try my best to let my naturalist habits spill over into my parenting which would make me a "crunchy mama", if I'm not mistaken. One thing I do not understand is how many time I've seen this phrase used as an intended insult. I've seen it just as many times used by other women like me who are crunchy and proud! I see no reason to be ashamed of being green, environmentally-friendly, carbon-footprint conscious, or whatever else you'd like to call it... I'm not sure if  the insults I've seen hurled towards us "hippies" are from others who afraid of going green (for some crazy reason), jealous that they don't have the time or the patience, or just naive about the whole subject and hurl insults instead of doing research... At any rate, no such "insults" have offended me in the least and all such comments have only driven me to start this blog...

For every crunchy mom out there who is sharing their stories, their research, and their "tricks of the trade" that's one more opportunity to reach someone we otherwise wouldn't. The more people who see that going green is easy, cost-effective, and good for everyone, the more we can better this planet for our children and grandchildren to come!